Showing posts with label DIY. Show all posts

Saturday, July 26, 2014

DIY Terra Cotta Succulent Planters


I have been wanting to decorate some terra cotta planters ever since I saw A Beautiful Mess's take with lace (see it here). BUT I didn't have anything to plant in cute little pots! Until... my kick-ass boyfriend surprised me with some tiny cacti and a palm tree, lol, for my birthday! I made a Goodwill run, grabbed a few things from around the house and begun!


Materials:
-Glass and or Terra Cotta pot's [I found mine @ Goodwill]
-Decorative lace, ribbon, burlap etc. [Hobby Lobby, they always have coupons online!]
-Little Projects Glue
-Scissors
-Fabric Measuring Tape
-Cute plants!

STEP 1:
Measure the area where you will be applying your decorative ribbon. Be sure to get the measuring tape as flat and tight as possible.

STEP  2:

Cut the amount of material you just measured. Cut as straight as you can! You want to avoid fraying material.

STEP 3:

Begin gluing material to the pot. I applied the glue to the material to begin and held it to the pot with my palm. Towards the end I applied the glue to the pot and then stuck on the material.

This step can easily be messed up, take your time! You want to be sure all the material is stuck to the pot and that there are no bubbles.


REPEAT THESE STEPS ON YOUR OTHER POT


STEP 4:


Tape the fabric measuring tape around the bottom and trace a line. Follow this line with masking tape.

Stick your finger in the paint pot and paint away! This paint is extremely easy to work with and can be smudged around with your fingers. I only applied one coat to this pot. (:

STEP 5:

I didn't want to glue anything onto the glass container so I used the paint. Using the bends on the container as lines, I placed my tape there and finger painted the space in-between.  Wait about 20 minutes and apply a second coat of paint.


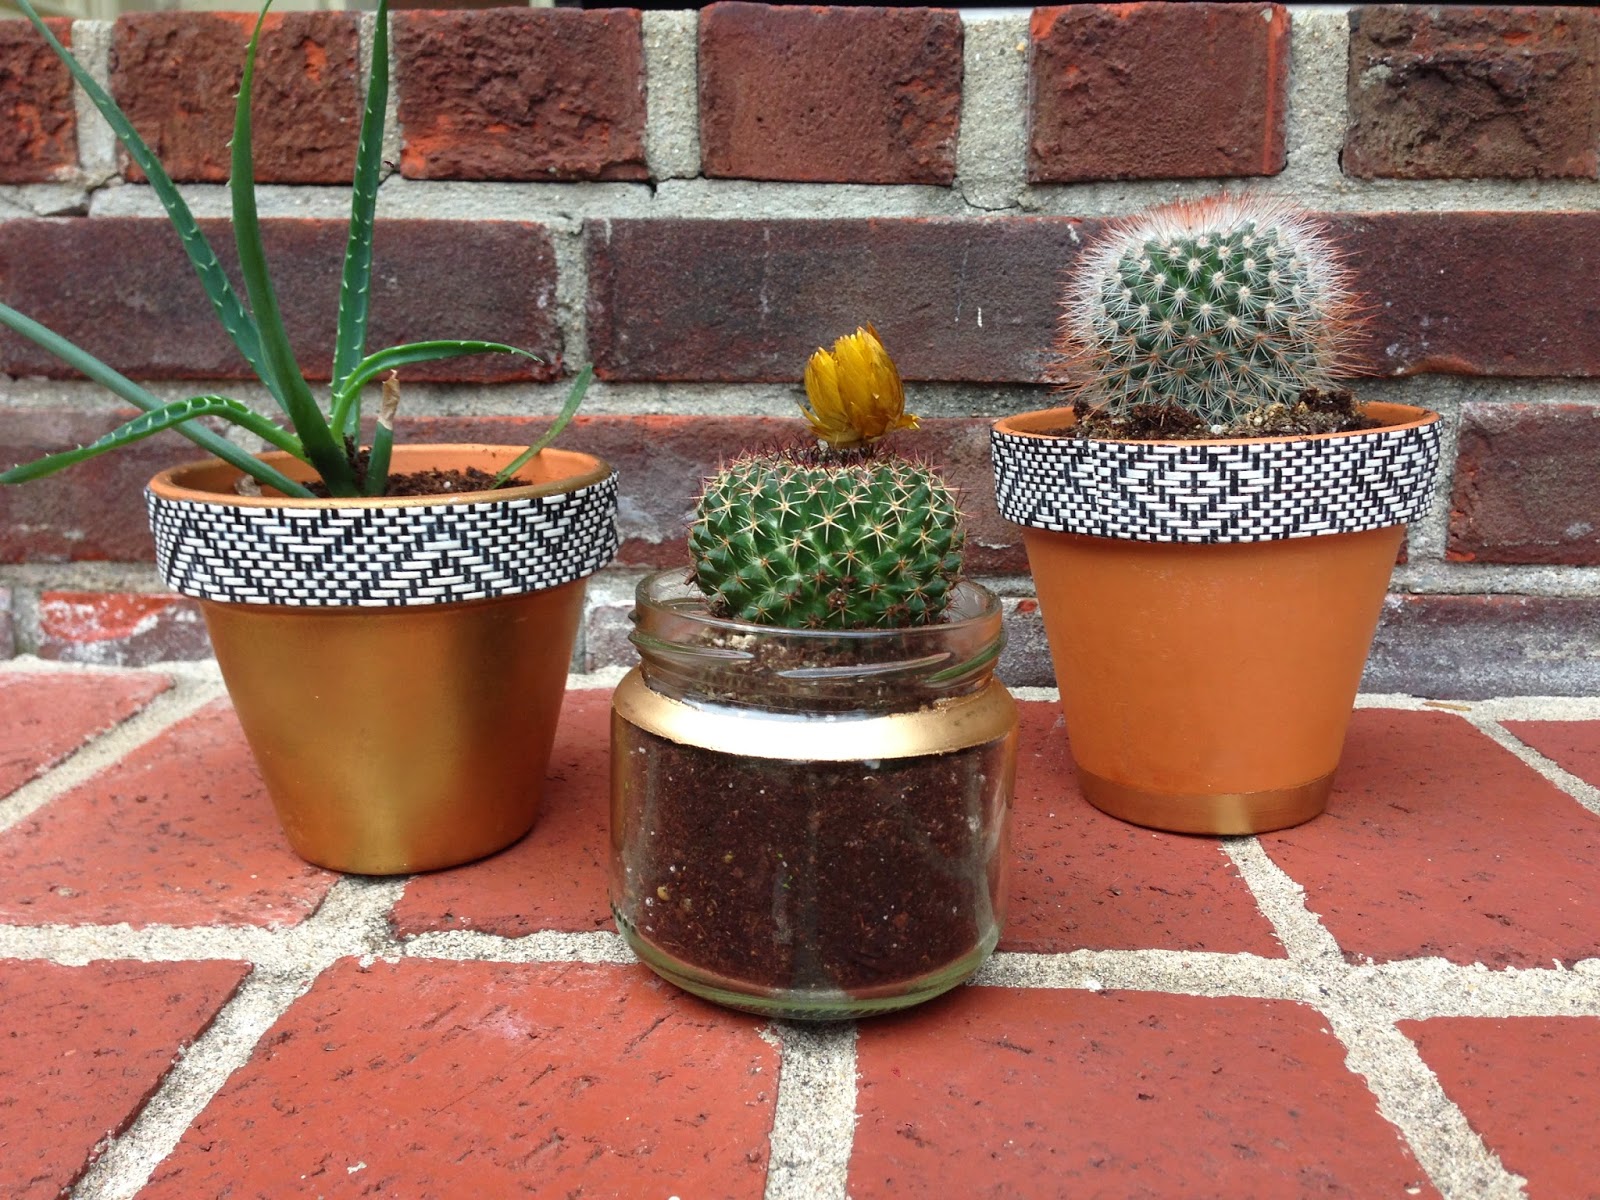
PLANT YOUR SUCCULENTS & VOILA!
There you have it! An incredibly cute and easy DIY <3

-M

Tuesday, March 11, 2014

Washi Tape Door DIY


I have a new found love for washi tape! Especially since Scotch recently came out with their own version, which is much easier to get your hands on. I've been having so much fun with the colorful tapes making faux picture frames and outlines on my wall, so...we decided to doll up our doors!

Here's what you need!
- Any size/pattern/color of washi tape (Any brand you desire)
- Scissors
- Measuring Tape (IF you want to be very precise)
- Pencil
- Door!

1. Measure from the left & right side and mark lines with a pencil down the door. Also, measure from the top & bottom of the door to mark where you would like your lines to start.
*We marked 3" in from the left & right side of the door. Then, at 11" in  from the top and bottom.*


2. Pick your tape & begin your vertical line at the 11" mark, while lining it along the 3" marks going down the door. (Be sure to use scissors, instead of ripping the tape, for straight lines.)


3. Repeat step two on the other side of the door. Next, measure and mark 3" from each top and bottom of your tape. From here you will create the design we have in our final image, put the tape going inwards to the whole design. 


4. From the tape marks on step 3, mark another 3" mark going upwards on top and downwards on the bottom. Next connect those lines with a horizontal tape line. 

Voila!
-M

Tuesday, January 28, 2014

I <3 You


I found this DIY on Pinterest. Shocker, right?! It was meant to be a Valentine's Day decoration, but I plan on keeping this up past Love Day. I tweaked a few things so here's my take!

Geometric Heart Decoration
What you need:
• 10 pieces of 12x12 scrapbook paper
(I used 4 light pink, 3 hot pink & 3 striped)
•Scissors
•Sticky tack
•Measuring tape or level 

1. Fold your 12x12 scrapbook paper in half so that it forms a triangle. Be sure you make a defined crease. Unfold & now cut your paper diagonally following the crease. Repeat this step with the rest of your paper.


2. I mapped out a quick sketch of what color paper I wanted each piece to be so that I could just slap it on the wall quick & easy. Not necessary, but makes sure your colors/patterns are spread out.


3. Take a tape measure (a level works if you have one) & mark a few lines horizontally on the wall so your heart won't be tilted.

4. Take a small piece of sticky tack & put it on each corner of the individual triangle.


5. Line up the top of the paper of the 2nd row of the heart to your horizontal marks on the wall. I started here so that I could have a starting point to fill in the rest of the pieces. Then you just put it together like a puzzle!


And...wooooop there it is! 
A super inexpensive, quick & easy DIY to get you in the lovin' mood! 

 -L

Click here for the original version!